How to setup your Microsoft Authenticator
2FA is a critical tool to protect your data from unauthorised access. The short video below runs you through the setup of Microsoft’s Authenticator and shows you how to make it the default sign in method.
We recommend Microsoft’s Authenticator over others because of it’s seamless integration with the Microsoft cloud systems like Office 365, Azure and the like.
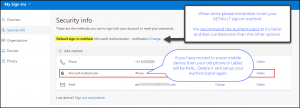
To kick this off start by navigating to your Account in Office 365 or click this link: https://mysignins.microsoft.com/security-info
If you are moving your Authenticator to a NEW Mobile device ?
Some write about backup of your Authenticator and we may cover that later but for now the easiest thing to do is just setup your Microsoft Authenticator again. The process is easy.
Go to the the My Sign-Ins page and make sure you have your mobile number and alternative email in the list and then just delete the Microsoft Authenticator option and setup Microsoft Authenticator again on your new mobile. This will involve scanning a QR code.
 Click to view the My Sign-Ins options
Tip: A common mistake people make when they add their account to their Microsoft Authenticator Mobile App is they choose the wrong Account Type. Your options is either a “Microsoft Account” or a “Work or School Account“. For business / work or school / education scenarios please choose “Work or School Account“.
Note: whenever Microsoft refer to a “Microsoft Account” anywhere in their platforms and systems they are referring to a personal account like a Hotmail account, not your work account and yes we know this is confusing but we think is born out of legacy systems evolving over time.
Video Walk through…
Switching to Passwordless Sign-in
If you have previously setup your Microsoft Authenticator for Push to Approve signin as shown above then you are in a good place.
We recommend using Passwordless Signin where you can provided if your IT have enabled it for you.
This quick video shows how to make the switch to Passwordless.